
Instruction
bellow will help you step by step with installation of ICONICS in unsecured mode and secured mode version 10.97.2 + Critical Rollup CFR2
Installation of GENESIS64 Basic and Advanced will be also highlighted
Installation of GENESIS64 Basic in Unsecured Mode
Microsoft SQL database
Install "Microsoft® SQL Server® ... Express" . It can be installed for free from official Microsoft site, for example Microsoft® SQL Server® 2019 Express

You can also install it from iconics installation file
From MS SQL Server installation menu select: New SQL Server stand-alone installation...
SQL Server Management Studio installation
Install SQL Management Studio (SSMS) from Microsoft Website or Iconics Suite installation file
Unlike the secured version installation, no additional settings are required on the MSSQL
Iconics Suite installation
Start RunMe application from Iconics Suite installation.ISO Go to Main Installation tab and click: ICONICS Suite and the installation will start
Allow your PC to install Shield Wizard
After installing go next and agree with terms
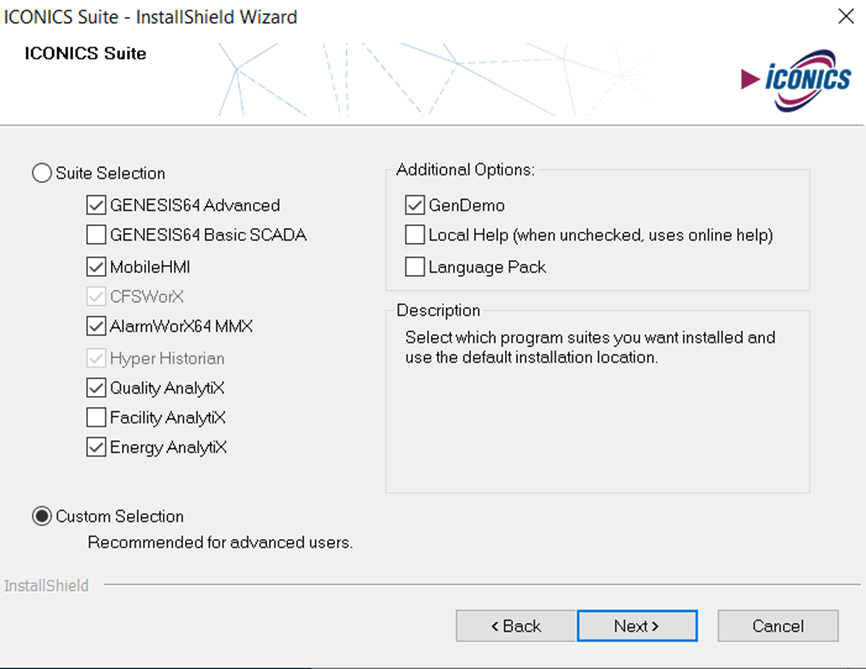
In the next step, select which modules you want to install

First two options are GENESIS ADVANCED/ BASIC is main choice of your installation
Only one of the versions - Basic or Advanced - can be installed on single machine. They differ with amount of modules, connectors and tags licences available. In Advanced version there is more licences included than in basic version.
In this screen user has option also to choose also additionaly licensed from top to bottom:
MobileHMI- Allows user to operate with visualizations, historical trends, and alarm notifications by using mobile devices like smartphones, tablets (License available in advanced version)
AlarmWorX MMX- Is enabling you to send and receive alarms using various multimedia agents.(License can be combined in both versions)
Quality AnalytiX- Enables operators, quality personnel, manufacturing engineers, and management to view quality SPC(statistical process control) data and other production parameters impacting product quality. (License can be combined in advanced version, non available in basic version )
Facility AnalytiX- License is giving user access to prepared projects(editable) which can be use in building automation (License can be combined in advanced version, non available in basic version )
Energy AnalytiX- Allows user to visualization, analysis of energy use (License can be combined in advanced version, non available in basic version )
Additional Options (included in GENESIS64 license)
Gen demo- Equipped with projects, samples from Iconics, which are helpful to learn for new users, this version has most of licences and capabilities of this environment and is giving user 12hrs of free trial.
Local Help- Offline help for users, if you don’t install this option, help will automatically move you to your browser and Iconics Institute website
Language Pack- This pack contains the localization files for the following languages:-French, -German, -Italian, -Portuguese
Next steps will show installation for BASIC VERSION with custom selection
You can change path of installation

In custom selection changes of basic installation are available to the user
In Application Servers you can find Hyper Historian option which normally is installed in full version. User should be aware that it is addtional licensed and need to purchased separately from GENESIS64,.
You can choose version included in GENESIS64 license which is "Hyper Historian Express" main difference is space for tags,
Hyper Historian has independent space for tags when Hyper Historian Express is using tags from Genesis64.

Installing GENESIS64 Basic in most cases Hyper Historian Express is used
After that you can follow next steps
In link below you can read about different for setup types
Enter your system Administrator password (for Windows account)
Then, you can create ICONICS user. It is new local user and doesn't have to be connected with Windows administrator
In this window, choose also type of installation - secured or unsecured (normal):
After normal installation you will be able to use Workbench without logging into Iconics system (with created user - ex. above: Iconics_User)
Using Secure setup, you will have to be logged in to use workbench
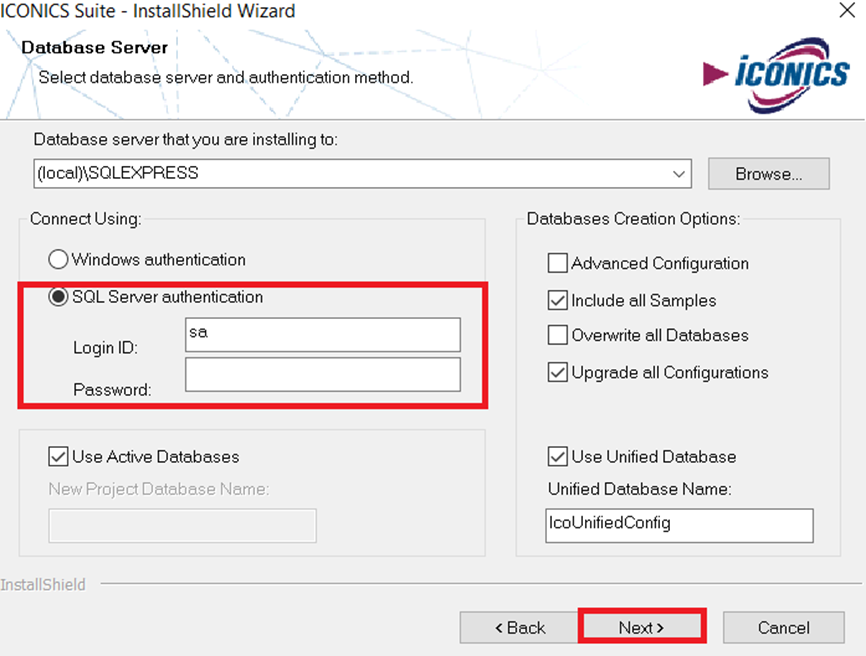
In next window select connection method to database
Windows authentication- credentials to data base are based on windows user and log in take place same as windows user
SQL Server authentication- more secure option- logging bySQL account. To have access to system both Windows and SQL administrator need to have privilages to use scada system
When installing demo version for tests it is fine to use unsecured mode of installation and connection to database with Windows authentication
After successful installation you can enter link below to download Rollup for your system
Periodically, Iconics releases system rollups designed to enhance system functionality.
Log on your ICONICS account and download CFR Rollup
After download, run setup.exe
Follow next steps of installation and accept term of license
Choose if you want to install Language Package
Confirm that you want to install CFR2
And restart your computer
Installation of GENESIS64 Advanced in Unsecured Mode
Microsoft SQL database
Install "Microsoft® SQL Server® ... Express" . It can be installed for free from official Microsoft site, for example Microsoft® SQL Server® 2019 Express
You can also install it from iconics installation file
From MS SQL Server installation menu select: New SQL Server stand-alone installation...
SQL Server Management Studio installation
Install SQL Management Studio (SSMS) from Microsoft website or Iconics Suite installation file
Unlike the secured version installation, no additional settings are required on the MSSQL server.
Iconics Suite installation
Start RunMe application from Iconics Suite installation.ISO Go to Main Installation tab and click: ICONICS Suite and the installation will start
Allow your PC to install Shield Wizard
After installing go next and agree with terms
First two options are GENESIS ADVANCED/ BASIC is main choice of your installation
Only one of the versions - Basic or Advanced - can be installed on single machine. They differ with amount of modules, connectors and tags licences available. In Advanced version there is more licences included than in basic version.
In this screen user has option also to choose also additionaly licensed from top to bottom:
MobileHMI- Allows user to operate with visualizations, historical trends, and alarm notifications by using mobile devices like smartphones, tablets (License available in advanced version)
AlarmWorX MMX- Is enabling you to send and receive alarms using various multimedia agents.(License can be combined in both versions)
Quality AnalytiX- Enables operators, quality personnel, manufacturing engineers, and management to view quality SPC(statistical process control) data and other production parameters impacting product quality. (License can be combined in advanced version, non available in basic version )
Facility AnalytiX- License is giving user access to prepared projects(editable) which can be use in building automation (License can be combined in advanced version, non available in basic version )
Energy AnalytiX- Allows user to visualization, analysis of energy use (License can be combined in advanced version, non available in basic version )
Additional Options (included in GENESIS64 license)
Gen demo- Equipped with projects, samples from Iconics, which are helpful to learn for new users, this version has most of licences and capabilities of this environment and is giving user 12hrs of free trial.
Local Help- Offline help for users, if you don’t install this option, help will automatically move you to your browser and Iconics Institute website
Language Pack- This pack contains the localization files for the following languages:-French, -German, -Italian, -Portuguese
Next steps will show installation for ADVANCED VERSION with custom selection
You can change path of installation
In custom selection changes of basic installation are available to the user
In Application Servers you can find Hyper Historian option which normally is installed in full version. User should be aware that it is addtional licensed and need to purchased separately from GENESIS64,.
You can choose version included in GENESIS64 license which is "Hyper Historian Express" main difference is space for tags,
Hyper Historian has independent space for tags when Hyper Historian Express is using tags from Genesis64.
After that you can follow next steps
In link below you can read about different for setup types
Enter your system Administrator password (for Windows account)
Then, you can create ICONICS user. It is new local user and doesn't have to be connected with Windows administrator
In this window, choose also type of installation - secured or unsecured (normal):
After normal installation you will be able to use Workbench without logging into Iconics system (with created user - ex. above: Iconics_User)
Using Secure setup, you will have to be logged in to use workbench
In next window select connection method to database
Windows authentication- credentials to data base are based on windows user and log in take place same as windows user
SQL Server authentication- more secure option- logging bySQL account. To have access to system both Windows and SQL administrator need to have privilages to use scada system
When installing demo version for tests it is fine to use unsecured mode of installation and connection to database with Windows authentication
Connect using:
Windows authentication- credentials to data base are based on windows user and log in take place same as windows user
SQL Server authentication- safer option- logging by sql account. To have access to system both Windows and SQL administrator need to have privilages to use scada system
After successful installation you can enter link below to download Rollup for your system
Periodically, Iconics releases system rollups designed to enhance system functionality.
Log on your ICONICS account and download CFR Rollup
After download, run setup.exe
Follow next steps of installation and accept term of license
Choose if you want to install Language Package
Confirm that you want to install CFR2
And restart your computer
Installation of GENESIS64 Advanced in Secured Mode
In secured mode installation some additional settins in MSSQL and firewall are required to start the system
Installation App
After
completing your request for trial please submit and follow the next steps
turn
on the following setting "Internet Information Services"
"Web
Management Tools" and "World Wide Web Services" will
automatically turn on
Microsoft SQL database
Install "Microsoft®
SQL Server® ... Express"
. It can be installed for free from official Microsoft site, for example
Microsoft® SQL Server® 2019 Express
You can also install it from iconics installation file
From MS SQL Server installation menu please click: New SQL Server stand-alone installation...
SQL Server Management Studio installation
Install SQL Management Studio (SSMS) from Microsoft website or Iconics Suite installation file
After installation open SSMS app and connect to server using Windows User credentials
Now
find "Properties" in your server
Set the following options:
After
applying changes go to
"Security">"Logins">"user" in case of this
instruction "sa" change password and turn off "Enforce password
policy" When enforce password policy is off your password won't expired in
time and password history is cleared.
Switch
to status and in Setting and Login turn same as below
Data Base Configuration
In Computer Management go
to "Services and Applications"> "SQL
Server...">"SQL Server Services" and make sure that SQL
Server and SQL Server Browser are running in Automatic mode,
if they are not running, start the services
Now
make sure that in "SQL Native Client 11.0
Configuration(32bit)">"Client
Protocols">"TCP/IP" is enabled and in properties default port
is 1433
Switch
to "SQL Native Client 11.0 Configuration"> "Protocols for
SQLEXPRESS"> and again make sure that TCP/IP is Enabled if not you can
change it in properties
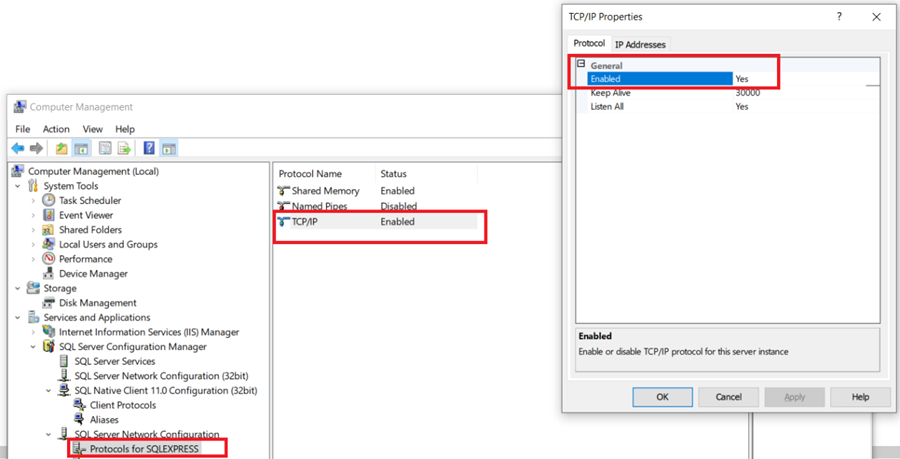
Then
in "IP Addresses" find "IPAII" and check if TCP PORT is on
1433 too.
Switch
to "SQL Native Client 11.0 Configuration">"Client
Protocols" and again TCP/IP must be enabled with default port of 1433
After
saving all changes go back to "SQL Server Services" and restart SQL
Server
Windows Firewall rules for ports
Open
advanced firewall settings
add new rule in "Inbound rule"
Choose
rule type and "Port"
Select
types of network for this connection
In next step allow the connection and apply all rules
add another inbound rules just like one
before but for PORT 1433 TCP
Iconics Suite installation
Please start RunMe application from Iconics
Suite installation.ISO Go to Main Installation tab and click: ICONICS Suite and
the installation will start
Allow
your PC to install Shield Wizard
After
installing go next and agree with terms
First two options are GENESIS ADVANCED/ BASIC is main choice of your installation
Only one of the versions - Basic or Advanced - can be installed on single machine. They differ with amount of modules, connectors and tags licences available. In Advanced version there is more licences included than in basic version.
In this screen user has option also to choose also additionaly licensed from top to bottom:
MobileHMI- Allows user to operate with visualizations, historical trends, and alarm notifications by using mobile devices like smartphones, tablets (License available in advanced version)
AlarmWorX MMX- Is enabling you to send and receive alarms using various multimedia agents.(License can be combined in both versions)
Quality AnalytiX- Enables operators, quality personnel, manufacturing engineers, and management to view quality SPC(statistical process control) data and other production parameters impacting product quality. (License can be combined in advanced version, non available in basic version )
Facility AnalytiX- License is giving user access to prepared projects(editable) which can be use in building automation (License can be combined in advanced version, non available in basic version )
Energy AnalytiX- Allows user to visualization, analysis of energy use (License can be combined in advanced version, non available in basic version )
Additional Options (included in GENESIS64 license)
Gen demo- Equipped with projects, samples from Iconics, which are helpful to learn for new users, this version has most of licences and capabilities of this environment and is giving user 12hrs of free trial.
Local Help- Offline help for users, if you don’t install this option, help will automatically move you to your browser and Iconics Institute website
Language Pack- This pack contains the localization files for the following languages:-French, -German, -Italian, -Portuguese
Next steps will show installation for ADVANCED VERSION with custom selection
You can change path of installation
In
custom selection changes of basic installation are available to the user
In Application Servers you can find Hyper Historian option which normally is installed in full version. User should be aware that it is addtional licensed and need to purchased separately from GENESIS64,.
You can choose version included in GENESIS64 license which is "Hyper Historian Express" main difference is space for tags,
Hyper Historian has independent space for tags when Hyper Historian Express is using tags from Genesis64.
After
that you can follow next steps
In link below you can read about different for
setup types
Enter your system Administrator password (for Windows account)
Connect
using:
Windows
authentication- credentials to data base are based on windows user and log in
take place same as windows user
SQL
Server authentication- safer option- logging by sql account. To have access to system both Windows and SQL administrator need to have privilages to use scada system
After successful installation you can enter link below to download Rollup for your system
Periodically, Iconics releases system rollups designed to enhance system functionality.
Log on your ICONICS account and download CRF Rollup
After download, run setup.exe
Follow next steps of installation and accept term of license
Choose if you want to install Language Package
Confirm that you want to install CFR2
And restart your computer